Home > Training Admin Role > Curriculum > Course Catalog
Course Catalog
Page Location: Admin > Curriculum > Course Catalog
The Course Catalog is a configurable table containing all active/inactive courses in Cyber Train. Courses serve multiple purposes in the system. They act as training requirements for students (employees), are templates for creating classes and are the means for developing skills. They also serve as the building blocks to put together programs, and can also result in obtaining credentials in the system.
What is displayed in this section?
How do I filter the course catalog view?
How do I add/create a course file?
Frequently Asked Questions
Back to the Top
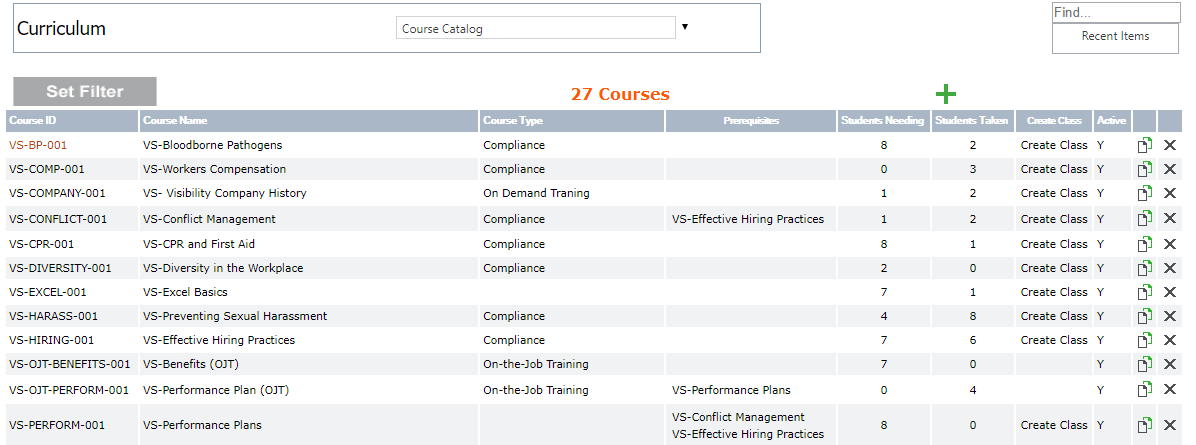
This table view gives a brief overview of each course file as well as some actions as a Training Admin's Group Security allows. The table view of this page is configured in the Course Catalog Summary View area.
Column/Field Name
|
What is displayed |
Actions Available |
| Course ID |
Course ID's must be unique for each course in the system. A coding scheme that makes sense to the organization and makes it somewhat obvious as to what the course is by looking at the Course ID is recommended. For more information visit the Course File section. |
Click the Course ID to access the Course File. |
| Course Name |
This is the name of the course. |
The column header can be clicked to sort the Course Catalog in ascending (one click) or descending (two clicks) order byCourse Name.
|
| Course Type |
This is a category that can be used to help organize the course files by the type of training delivery if something other than the company field or misc fields is needed. To update these categories go to Course Type codes. |
The column header can be clicked to sort the Course Catalog in ascending (one click) or descending (two clicks) order by Course Type.
|
| Prerequisites |
If there are other courses that need to be taken or considered prior to taking this one, they are listed here. |
N/A
|
| Students Needing |
The number displayed indicates the number of students needing this course. Important consideration when looking at these numbers:
(1) If the course has a renewal frequency, this number will rarely get smaller because as soon as the employee completes the requirement, the new one is added to the outstanding requirements.
(2) If the course is not a renewal course, then the number will move towards zero over time.
|
The number here is a hyperlink that takes the user to the Students Needing Page in the course file which lists all the students who need this requirement as well as when they need to have it completed (Date Needed).
|
Students
Taken |
The number displayed indicates the number of times this course has been taken by students. For courses with a renewal this number will include each time a student has completed the course. |
The number here is a hyperlink that takes the user to the Students Taken Page in the course file which lists all the students who have taken this requirement as well as when they have completed it (Date Completed).
|
| Create Class |
This hyperlink is controlled by a security permission via Group Security. If the TA has the ability to add classes this link will be visible.
|
This hyperlink takes a TA to the 'Add Class' page to start the process to add a class for this course. |
| Active |
This Y/N field indicates whether the course is active (Y) or inactive (N). |
The column header can be clicked to sort the Course Catalog in ascending (one click) or descending (two clicks) order by Active status.
|
| Copy Course |
This icon/hyperlink is controlled by a security permission via Group Security. If the TA has the ability to copy courses this link will be visible.
|
This overlapping pages icon/hyperlink takes a TA to the 'Copy Course' page to start the process to add a new course to the catalog using the .
|
| Delete |
This hyperlink is controlled by a security permission via Group Security. If the TA has the ability to delete courses this link will be visible. |
This X icon allows you to delete course files.
IMPORTANT NOTE: If you delete a course file, you are deleting the course from the database permanently including removing it from student files.
|
Back to the Top
The Course Catalog contains all active/inactive courses in Cyber Train.
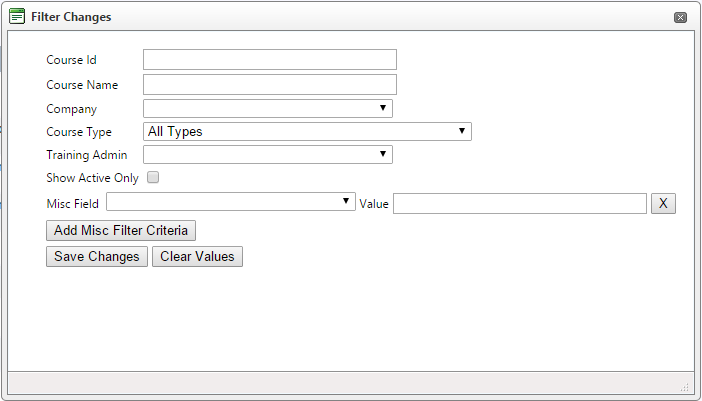
Set the filters you want for the Course Catalog view here. The more filters you enter here, the more restricted your Course Catalog view will be. Options here are as follows:
Column Name
|
What the Information Is
|
Actions Available |
| Course ID |
Open Text field that searches 'Course ID' fields. |
Partial Searches are available here as well. |
| Course Name |
Open Text field that searches 'Course Name' fields. |
Partial Searches are available here as well. |
| Company |
Drop-down field that limits the search to the company selected. |
BLANK means all companies are considered. |
| Course Type |
Drop-down field that limits the search to the course type selected. |
Default is 'All Types' meaning all course types are considered. |
| Training Admin |
Drop-down field that limits the search to the training admin selected. |
BLANK means all training admins are considered.
|
| Show Active Only |
When this checkbox is checked, only course files where the 'Active field = Yes' are considered. |
N/A |
| Misc Field |
Drop-down field that limits the search to the misc field selected or entered. |
N/A |
| Value |
Depends on the misc field properties and whether it is an open text field or drop down field. |
N/A
|
| Add Misc Filter Criteria |
Click this button to add additional misc fields to the filter. |
N/A
|
| Save Changes |
Click this button to accept the changes entered. |
Refreshes the Course Catalog page to show all courses that meet the selected criteria. |
| Clear Values |
Click this button to clear all the values entered. |
N/A |
Back to the Top
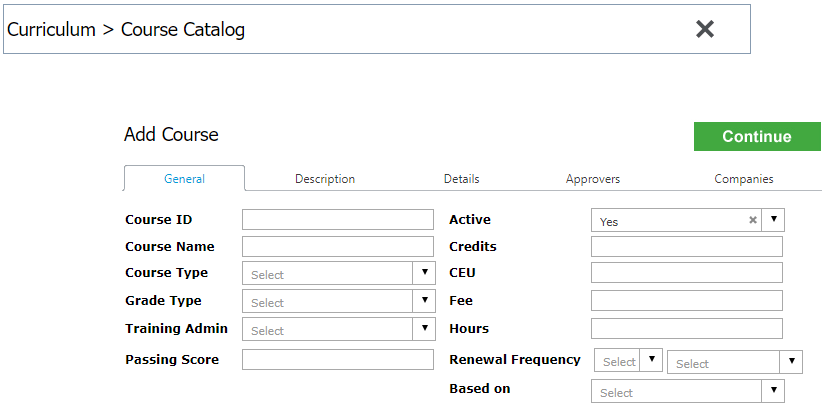
To add a new course to the system, click on the Add icon (Plus Sign or Book with a Plus Sign) at the top right-hand corner of the table or, if the course is to replace an existing course that needs some updating and/or a new test, click the Copy (Overlapping Pages) icon. Once the button is clicked, a wizard-like process starts, walking you through the add new course pages.
(1) The General Tab of the Add Course process is where the main details of the information is added. For more information about the fields listed here, review the 'What is Displayed Here?' section of the Course File page. It is important to note that once the Course ID is entered here and the record is saved, the field is grayed out and cannot be changed. The Description Tab and the Details Tab are optional tabs of information.
(2) The Description Tab is a great place to enter an overall description of the course and/or syllabus information, pre-course actions, etc... The information is displayed to the student in a hover over feature in the requirements section of the Home Page > My Record.
(3) The Details Tab displays the miscellaneous information fields that are available if capturing information over and above the standard fields is necessary. For more information about these fields. check out the Course/Class Detail page.
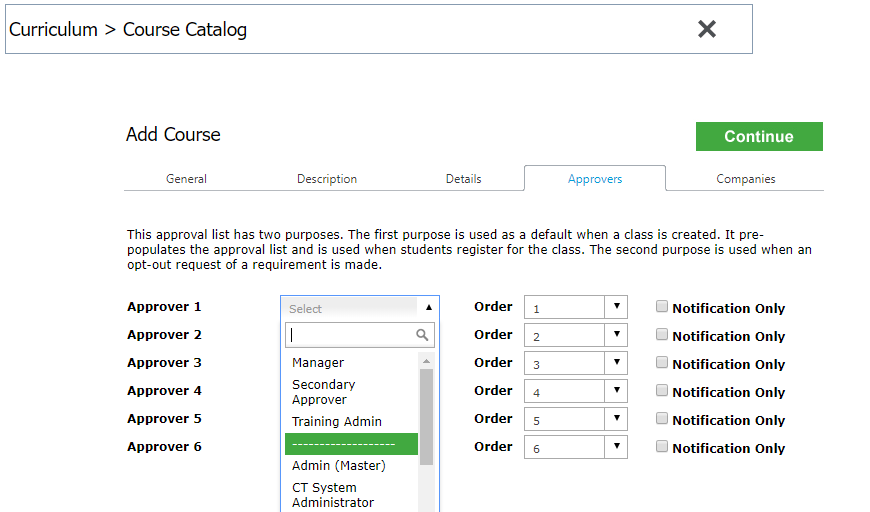
(4) The Approvers Tab is where approvers are set for the course. This is important if allowing Opt Out requests for students in the Home Page Security and is the default for class enrollment requests The Approvers can be a specified user of the system (meaning someone who has a User Security profile) or a role in the system such as Manager, Secondary Approver, and/or Training Admin. The Order field determines when in the approval process the approver is notified or approval requested. The Notification Only checkbox is checked only for those in the process who do not need to approve, but need to be aware of the request.
(5) The Companies Tab indicates what companies have access to the course. A COMPANY MUST BE SELECTED or the Course will not be available in the Course Catalog. Move the company from the left selection box to the right selection box. To do this, highlight the company name in the left selection box and click the Add >> Button. If a company was moved over by mistake, highlight the company in the right selection box and click<< Remove button.
(6) Click Continue
(7) On the Add Course Prerequisites Page, select any course(s) that need to be taken prior to this course. To select a course highlight (hold the CTRL key down to select more than one) and click the Continue button to move forward.
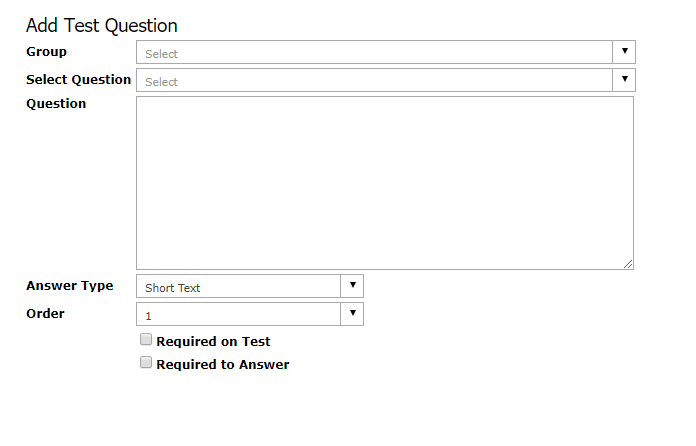
(8) On the Course Test Questions Page, add or select the questions needed to confirm the student has completed and/or understands the course content. Note: Course specific test questions may be added here manually or can be selected from the Test Question Bank (previously added questions/answers that can range across courses.). When done click the Save Changes Icon (Floppy Disc in Banner) to complete the Add Course process.
Back to the Top
How do I copy a course file?
To make a copy of a course because you want to start another one that is similar or because you have a revised version of the course, click the Copy Icon in the record of the course that needs to be copied. This will copy over all the information in that course starting the Add Course process. If you do not see this icon at the end of the course record, then the group security permission to do this action is not enabled.
When you add notes on a course attachment, students cannot see them. How can I add notes for Students to see?
The notes for a course file (or a class file) are not intended for the student rather those who have access to the file like a Training Admin, Instructor or any other User. These notes are to help users understand what the attachment is, what it is used for and/or any other instructions/information as needed. As for the student who might need to know more when to review all attachments of the course or class, the following is recommended:
(1) Create a 'Course Syllabus' or 'Class Syllabus' attachment type and then add the notes needed on this document/attachment. Make the hyperlink for the attachment read something like 'Class Syllabus (Read First) or 'Course Syllabus (Read Before Class Start)'.
(2) Additionally with 'Class Enrollment Emails' or 'Class Reminder Emails' that go to the student either manually or automated upon class approvals/email alerts, put verbiage in the email template to review any class requirements that might require some action prior to the class starting by reviewing a 'Class Syllabus' when available.
How can I get attachments in the course file to copy over to the class file?
The course attachment type codes need to be the same as the class attachment codes.
|