Home > Reporting > Building Reports > How to Schedule Reports
How to Schedule Reports
Reports and Dashboards can be automated to email. Follow the below steps.
Server Configuration (Not in Cyber Train)
(1) In the Cyber Train root folder, look for a folder called "Reporting".
(2) In that folder, verify the file called IzendaScheduler.exe.
(3) On the Cyber Train web server, use the Windows Scheduler to schedule this file to execute as often as needed (every day, every hour, every 30 minutes, etc...)
(4) When scheduling the IzendaScheduler.exe, it MUST include a parameter that points to the rs.aspx page in the Reporting folder. The report will not run if this is not right.
For example, if the Cyber Train URL is http://HRServer/CyberTrain, then the parameter would look like this: http://HRServer/CyberTrain/Reporting/rs.aspx?run_scheduled_reports=1.
NOTE: For this feature to work, .NET 4.0 needs to be installed on the server.
Group Security
All reports are categorized. If an report needs to be automatically emailed, those users MUST have access to that category of reports via Group Security.
Report Configuration
(1) In the report, click on the ‘Misc’ tab or in the Dashboard click on the Calendar icon (Schedule).
(2) The IzendaScheduler.exe file is required for this section of the ‘Misc’ tab to appear at the bottom of the page.
| Field |
Purpose |
| Schedule |
Enter the Date/Time to start running this report. This is a reference point for the Repeat Type.
Example: The report should run at 9:00 am each day then enter 9:00 am here.
|
| Repeat Type |
Select how frequently this report should be run. |
| Send Email as |
Select how the report should appear in the email.
NOTE: Link will be a link back to Cyber Train. If the goal is to send the report without needing to access the computer, select a different method.
|
| Recipients |
Enter the email addresses in the space provided separated by a semi-colon ( ; ).
Each of these accounts will be emailed the report based on the specifications.
|
Repeat Type
The repeat type references the schedule date and time to determine when the report should be sent out.
For example, if the schedule time is set to 9:00 am on Monday, March 16th, 2017, the report will trigger as follows.
| Option |
Example |
| Every Day |
Every day at 9:00 am |
| Every Weekday |
Monday - Friday at 9:00 am |
| Every Week |
Every Monday at 9:00 am |
| Every Two Weeks |
Every Other Monday at 9:00 am |
| Every Month |
On the 16th of the Monday at 9:00 am |
| Every Quarter |
On the 16th of March, June, September and December at 9:00 am |
| Alert Hourly |
Every hour starting at 9:00 am |
| Alert Daily |
Every day |
| Run Once |
This will run the report one time only. |
Send Email as
This is how the report will look in the email.
| Option |
Explanation |
| Link |
Provides a link back to view the report inside Cyber Train. The user must have a Cyber Train account to login and see the report. |
| Embedded |
Includes the report details in the body of the email. |
| HTML2PDF |
Includes the report details as a PDF attachment to the email. |
| CSV |
Includes the report details as a CSV (comma delimited format) attachment to the email. This format can be read by Excel and other spreadsheet programs too. |
| HTML |
Includes the report details as a HTML document in the email. |
| XLS (MIME) |
Includes the report details as an XLS (excel) attachment to the email. |
| Word (RTF) |
Includes the report details as a RTF (rich text format) attachment to the email. This format can be read by Word and other word processing programs too. |
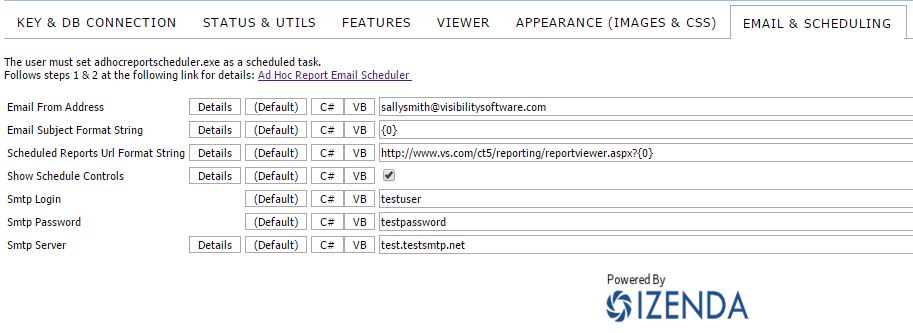
SMTP Authentication (Version 5.1.1 & Higher)
If SMTP Authentication is being used,
(1) Go to Admin > System Setup > SMTP Server Link.
(2) Enter the fields needed there - User ID, Password and SMTP Port fields.
(3) Click Save Changes
(4) Then go to the URL and change the '/SystemSetup.aspx' part to be '/reporting/Settings.aspx'.
(4) Click on the 'Email & Scheduling' Tab
(5) Verify the SMTP information is correct. If not, update it as needed and save the changes.

SMTP Authentication (Version 5.1.0 & Lower)
If SMTP Authentication is being used,
(1) Go to Admin > System Setup > SMTP Server Link.
(2) Enter the fields needed there - User ID, Password and SMTP Port fields.
(3) Then go to the Report Writer > Design View - Look for and click on the cog icon (black wheel with spokes.)
(4) Click on the 'Email & Scheduling' Tab
(5) Verify the SMTP information is correct. If not, update it as needed and save the changes.
See also
|