Home > System Admin Role > Links & Integrations > Sage Integration
Sage Integration
Cyber Train and Sage HRMS can be connected to update employee information as it changes in the Sage HRMS.
Reach out to product support for information on what is needed in your environment and where to set up the tools on your server. The instructions below are based on having the infrastructure and necessary files already in place. Additionally, the instructions are based on your system NOT being hosted by Visibility Software. If it is hosted by Visibility Software, the support team will assist in providing specific URLs and credentials.
Configuration Settings
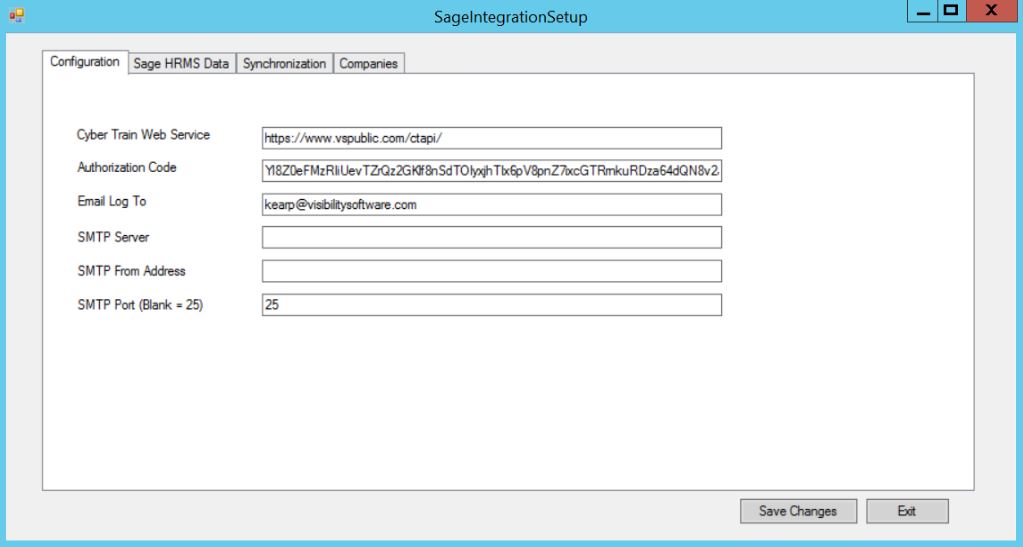
Configuration Tab
This tab establishes the connection to the Cyber Train system.
- CT Web Service = URL to the Cyber Train API. The URL endpoint would be determined by your IIS and DNS settings. Reach out to product support if you need details on this setup.
- Authorization Code = This can be found by opening the AppSettingsOverride.config file in the Cyber Train file structure. It will be the 'value' found in the line which contains add key = "ConString"
- Email Log To = Who should receive the log every day after it runs can be left blank if nobody should get it
- SMTP Info = Required for the email to work (not necessary if you don’t fill in Email Log To)
- SMTP Port (Blank =25) =
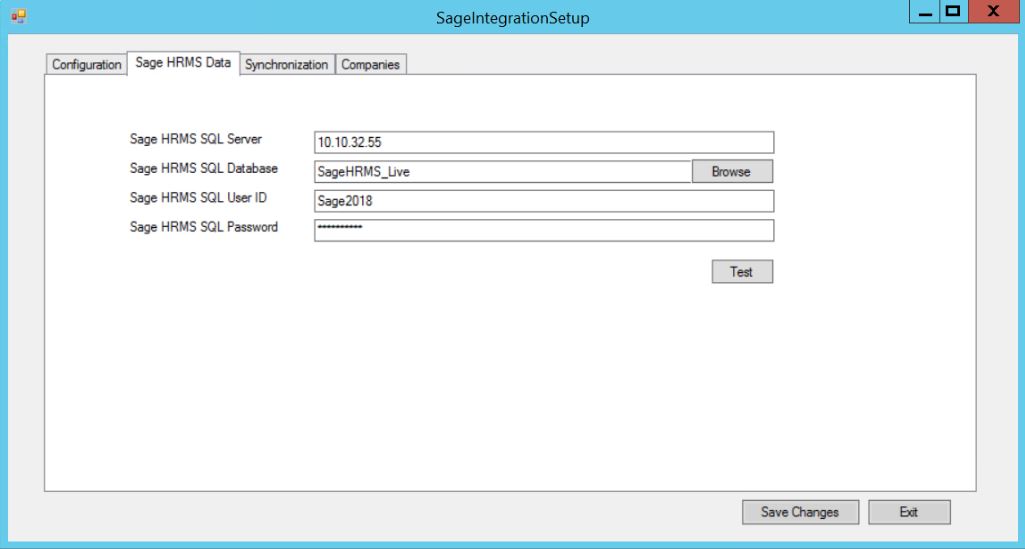
Sage HRMS Data Tab
This tab establishes the connection to the Sage HRMS system.
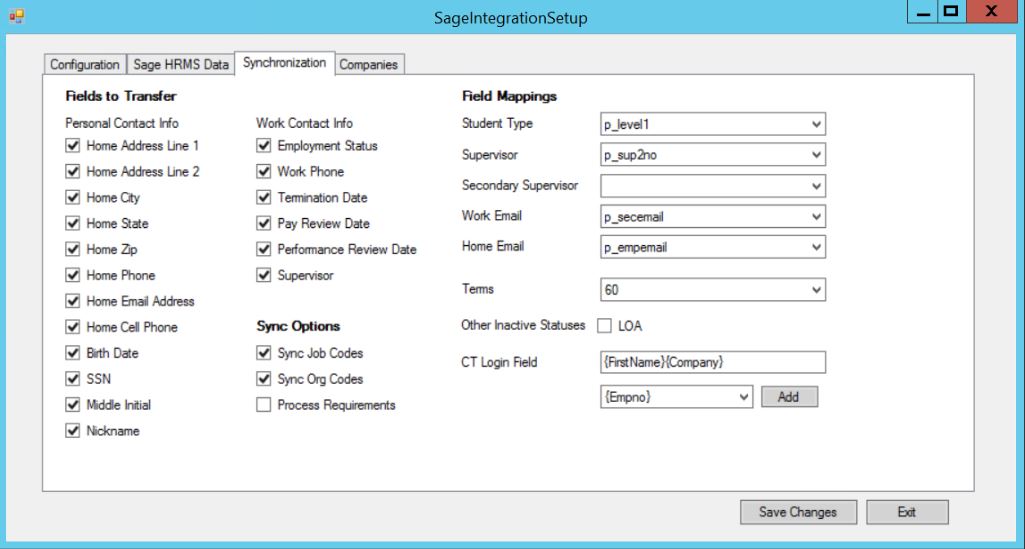
Synchronization Tab
Fields
This tab identifies optional fields to map over to Cyber Train.
Field already automatically mapped include:
First name
Last name
Company
Employee ID
Student (Yes/No)
Manager (Yes/No)
Hire Date
Job Title / Start Date
Organizational Level / Date
Status (Active)
Primary Email ("Work")
To transfer additional fields, check the field or use the mapping option to select which field in Sage HRMS should be used for the data in Cyber Train. Additional optional fields to transfer from Sage HRMS to Cyber Train include.
|
Mapping Option
(Integration Program)
|
Sage HRMS |
Cyber Train
Contact Info Page
|
Note |
|
| Home Address 1 |
Demographics > Address and Phone > Street 1 |
Contact Details > Home Contact > Address 1 |
|
|
| Home Address 2 |
Demographics > Address and Phone > Street 2 |
Contact Details > Home Contact > Address 2 |
|
|
| Home City |
Demographics > Address and Phone > City
|
Contact Details > Home Contact > City |
|
|
| Home State |
Demographics > Address and Phone > State
|
Contact Details > Home Contact > State |
|
|
| Home Zip |
Demographics > Address and Phone > Zip
|
Contact Details > Home Contact > Zip |
|
|
| Home Phone |
Demographics > Address and Phone > Home
|
Contact Details > Home Contact > Phone |
|
|
| Home Cell Phone |
Demographics > Address and Phone > Cellular
|
Contact Details > Home Contact > Cell |
|
|
| Birth Date |
Demographics > Personal > Birth Date |
Personal Details > Birth Date |
|
|
| SSN |
Demographics > Personal > SSN/SIN
|
Personal Details > SSN/SIN |
|
|
| Middle Initial |
Demographics > Personal > Middle
|
Contact Details > Middle Name |
|
|
| Nickname |
Demographics > Personal > Nickname
|
Contact Details > Nickname |
|
|
| Employment Status |
Current Job > Job > Employment Type |
Job Details > Employment Type |
|
|
| Work Phone |
Demographics > Address and Phone > Business
|
Contact Details > Work Contact > Phone |
|
|
| Termination Date |
Termination > Termination Data > Termination Date |
Job Details > Termination Date |
|
|
| Pay Review Date |
Current Pay > Pay and Performance > Next Pay Review |
Job Details > Pay Review Date |
|
|
| Performance Review Date |
Current Pay > Pay and Performance > Next Review
|
Job Details > Performance Review Date |
|
|
| Student Type |
|
Job Details > Student Type |
If this is tracked in Sage as a mic. field. identify it. |
|
| Supervisor |
Job and Pay > Current Job >Supervisor or Secondary Supervisor |
Job Details > Manager |
Select which supervisor field should be used |
|
| Secondary Supervisor |
Job and Pay > Current Job >Supervisor or Secondary Supervisor
|
Job Details > Secondary Approver |
Select which supervisor field should be used
|
|
| Work Email |
Demographics > E-mail or Alt e-mail |
Contact Details > Work Contact > Email |
Select if this should pull from the "e-mail" or "alt. e-mail" field |
|
| Home Email |
Demographics > E-mail or Alt e-mail
|
Contact Details > Home Contact > Email |
Select if this should pull from the "e-mail" or "alt. e-mail" field
|
|
Sync Options
Sync Job Codes - check checked will add any codes into Cyber Train which are added to Sage HRMS. If using this feature, be sure to map the codes on the final tab
Sync Org Codes - check checked will add any codes into Cyber Train which are added to Sage HRMS. If using this feature, be sure to map the codes on the final tab
Process Requirements - If the job and organizational codes assigned to a student have requirements attached, this feature will add any requirements
Terms - Select either 30, 60 or 90 days. This is how many days out from the Termination Date the employee will be included in the transfer when the Employee Status = Terminated (P_Active = T). Terminating someone in Cyber Train will change the status to inactive and remove any classes to which the student is currently enrolled.
Other Inactive Statuses - Currently this is only LOA. When the Employee Status = LOA (P_Active=L) it is treated as an 'Active' status UNLESS this checkbox is checked and then it is considered an Inactive status. When this checkbox is checked, the employee will remain on the transfer field as Inactive until the employee is active or termed.
CT Login Field
If using Sage ESS and logging in via a link, do NOT enter anything in this section. Otherwise, if the login should be pre-formatted, select the fields to make up the employee's login for Cyber Train.
The options are:
(i) Student's Employee Number {Empno}
(ii) Company {Company}
(iii) First Name {FirstName}
(iv) First Initial {FirstInitial}
(v) Middle Initial {MiddleInitial}
(vi) Last Name {LastName}
(vii) Last Initial {LastInitial}
NOTE:
- A BLANK values means the Student ID will not be included in the transfer file.
- The scheme is ONLY added when a new student record is added. It will NOT update if the student name changes and needs to be manually changed on the Contact Info tab in Cyber Train. This is designed to auto populate a login ID but to allow for adjustments if needed. For example, if the scheme is set to generate an ID based on First Initial and Last Name, TSMITH could be generated for Ted Smith and Tony Smith. In Cyber Train, the field can be updated to make it unique after the student file is created.
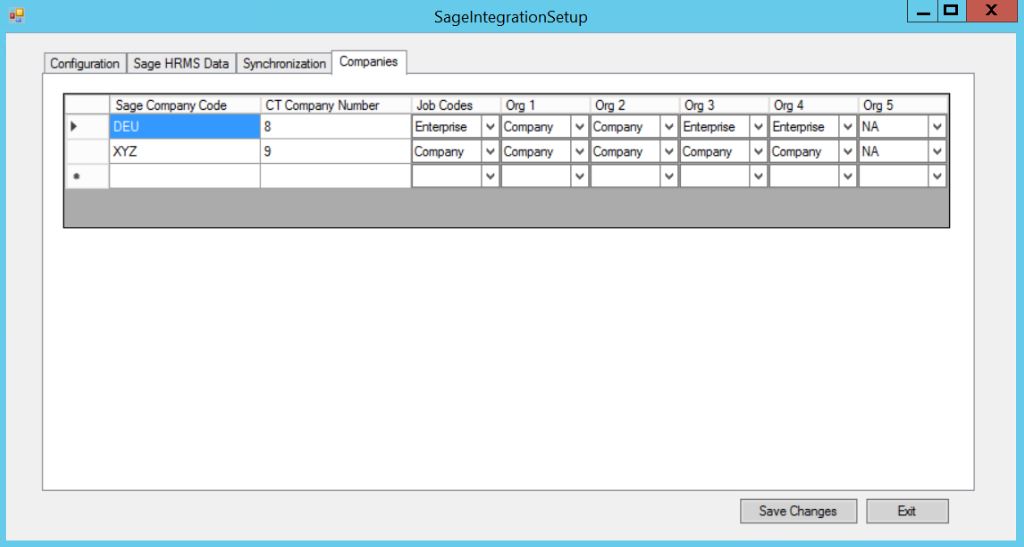
Companies Tab
The fourth tab does two things (1) it indicates what company in SageHRMS should be connecting with Cyber Train and (2) it maps the location of the codes in Sage if the 'sync' feature is activated.
(1) Enter the 'Sage Company Code' in the first column and then the matching 'Cyber Train Company Number' in the second column.
(a) To locate the company code you will log into Cyber Train navigate to Admin > Codes > Companies.
(b) Click on the edit pencil for your company and note the SEQ=# in the URL– the number indicated is the company.
(c) In the screenshot below the company number is 8.
(2) Use the drop-downs to select what levels (Company or Enterprise) the Sage codes should pull from in Sage to the CT. If there are no codes for a certain level select N/A. NOTE: this does not enable or stop jobs and organizational levels from being added to the student. this is only used for the syncing feature.

See also
|