Home > System Admin Role > Links & Integrations > xSage > xSage HRMS > xFoxPro Direct Connection
xFoxPro Direct Connection
NOTE: While this integration is available for us, Visibility Software no longer updates or makes changes to this integration.
With this integration setup, Cyber Train and the Sage HRMS systems are connected via an ODBC or OLE DB connection which allows Cyber Train to pull student information from Sage HRMS. This is a one step process; however it does require direct connection between the two systems. Additionally, it is recommended to automate this process via a window scheduler so that it can be done daily or as often as needed. With the scheduler, employees are added and updated in Cyber Train except for employees who have been 'Termed' for more than 30 days in the Sage HRMS system.
Establishing Connectivity on the Servers
The process for transferring student information from Sage HRMS to Cyber Train requires knowledge to establish a connection to the FoxPro database. Once the connection information is obtained, follow the below steps.
Step 1: Setup the Connection on the Cyber Train Server
- Download the Visual FoxPro OLEDB component (http://www.vspublic.com/xports/VFPOLEDB.zip), unzip and install on the Web Server.
- Create a Domain User on your network to be used specifically for Cyber Train
- Open IIS on the Cyber Train web server and go to the Advanced Settings of the Application Pool that Cyber Train is a part of Edit the Identity for that pool and change it to the Domain User you created, you will need the password for this step Change the Load User Profile setting to True Save and close the Application Pool Advanced Settings
- Edit the NTFS security settings on the Cyber Train installation folder. Give full access to the Domain User you created
- Edit the NTFS security settings on the C:\Windows\Microsoft.NET\Framework\v2.0.50727\Temporary ASP.NET Files folder, giving full access to the Domain User you created.
- Go into Regedit and find the keys HKEY_LOCAL_MACHINE\Software\Visibility Software\Cyber Train and HKEY_LOCAL_MACHINE\Software\Wow6432Node\Visibility Software\Cyber Train (if it exists). For both, give full access for that key to the Domain User you created
Step 2: Setup the Connection on the Sage HRMS Server
- Give the Domain User you created Modify access to the Share you created to expose the Sage HRMS data folder.
- Give the Domain User you created Modify NTFS access to the Sage HRMS\Data folder itself
- Go into the Local Security Policy applet and assign the Domain User you created to the following policies… Logon as a Service Logon as a Batch Job Replace a Process Level Token Adjust Memory Quotas for a Process
- From within Sage HRMS
- Find the path to the Sage HRMS Data Directory
- Log in to Sage HRMS
- Go to Help / Sage HRMS
- Click the System Information tab
- Write down the Data Path
Step 3: Go Back to the Cyber Train Server
- Ensure that Sage HRMS has an assigned path viewable by this computer
- Find the web.config file in the Cyber Train root installation folder and open it in Notepad.
- In the <AppSettings> section of the web.config file, add the following line
<add key="AbraPath" value="\\ServerName\AbraShare" />
Replace “\\ServerName\AbraShare\” with the full path to your Sage HRMS data directory.
The path should be a UNC path, not a drive letter path.
Step 4: Setup Defaults & SQL Information in Cyber Train
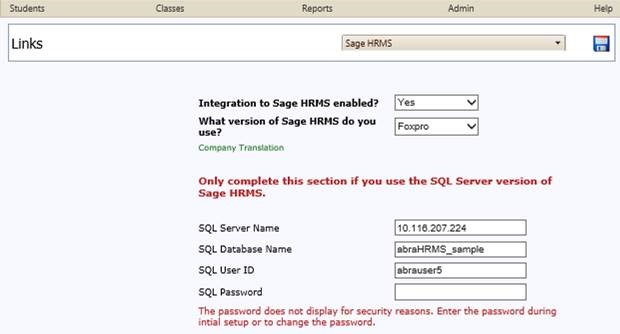
This step is done within the Cyber Train system. Page Location: Admin > Links > Pre Defined Links > Sage HRMS.
|
Question/Field
|
Response
|
Result
|
|
Integration to Sage HRMS enabled?
|
Yes
|
Turns the feature on and allows for the connection.
|
|
No
|
Turns the feature off and does not allow for the connection.
|
| What version of Sage HRMS do you use? |
Fox (Direct) |
N/A
|
| Company Translation |
Link |
Click on the Link to establish the connection between the right Sage HRMS database and the right Cyber Train company.
This is a one time setup and only needs to be updated should the Sage HRMS database or Cyber Train company change. |
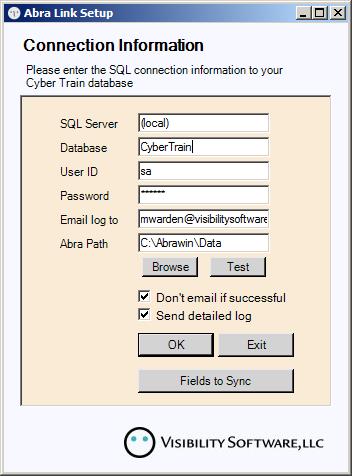
Step 5: Setup SQL Connection
Download and unzip http://www.vspublic.com/CTUpdates/tools/CTAbraLink.zip into an empty folder on the Cyber Train web server. Once unzipped, right-click/Run-As-Administrator on AbraLinkSetup.exe.
Enter your SQL connection information to the Cyber Train database and the UNC path to your Abra FoxPro data dictionary in the Abra Path field.
Click the 'Fields to Sync' button to get the next page where you can choose to which fields should be transferred from Abra FoxPro to Cyber Train.
Step 6: Sage HRMS Fields to Sync with Cyber Train
On this page, check each box for the fields you want to transfer from Sage HRMS (AbraFoxPro) to Cyber Train. If you want to know all the fields that transfer and update with this program, check out the Sage HRMS page.
NOTE: Everything is driven by the P_ACTIVE field in Sage HRMS. Thus, if an employee's P_ACTIVE field equals 'T', then the Employee is added as 'I' for 'Inactive' into Cyber Train. If the employee is anything other than a 'T,' the employee is added as 'A' for 'Active' into Cyber Train.
Once you’ve completed this configuration step, click the 'OK' button and schedule the executable 'AbraLinkEXE.exe' to run nightly. This is the executable that actually syncs the Sage HMRS FoxPro and Cyber Train data every time it runs, based upon the settings you chose above.
;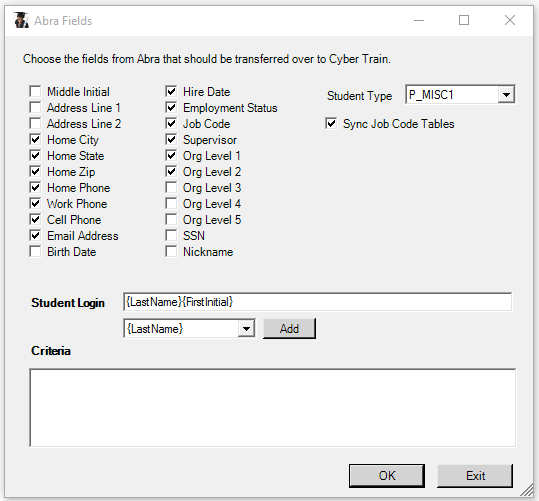
Student Type Field
The 'Student Type' field is a drop-down field allows you to select the code table to populate the Student File > Contact Info Page > Job Details Tab > 'Student Type' field in Cyber Train.
The Student Type options are: P_Employ (Employment Status); P_MISC1, P_MISC2, P_MISC3 (HR Status Misc Fields); P_JMISC1, P_JMISC2 (Current Pay Misc Fields) or P_LEVEL1-5 (Organization Levels). NOTE: When the Student Type = BLANK, it will treat the field like it is not being used so that if you want to track something in Cyber Train differently than what you are tracking SageHRMS, you can do this.
Sync Job Code Tables Field
When the 'Sync Job Codes' checkbox is checked, any job codes/job titles added in Sage HRMS will be updated and added to the Cyber Train Job Code table for that company.
Technical Note: What this does in the background is pulls the codes from HRTABLES in Sage HRMS where ftable="JT" and frule 'N' and scrolls through them one at a time. For each one, it checks to see if that exact job code exists in Cyber Train Job Codes Table for the same company. Cyber Train has an Sage HRMS-to-CT code translation table so this process can work on a per company basis. If the code is not in the Cyber Train Job Codes Table, then it is added.
Supervisor Field
The 'Supervisor' checkbox not only updates the Student File > Contact Info Page > Job Details Tab - Supervisor Field but it always update the Secondary Supervisor (Sage HRMS) in the Secondary Approver field (Cyber Train) as well. So the one checkbox updates both fields as applicable.
Student Login
The Student Login section allows you to choose the segments to automatically update the Student File > Contact Info Page > Contact Tab > System Login Field. Note: Since this field will update every time this process runs, you should only use this if your students do not have exceptions for their logins.
See also
|