Home > System Admin Role > Processes > Import Requirements
Import Requirements
The Import Requirements menu item of Admin > Processes allows an Admin User to import an Excel spreadsheet (.xls NOT .xlsx) of Requirement data into the main Student table. The spreadsheet file can be saved to the computer under any title but the worksheet where the information is listed in the spreadsheet needs to be Sheet1. The worksheet titles are at the bottom of the page and they look like tabs. We recommend not importing more than 500 records at a time not only because of the time it takes but smaller imports allow for better control and verification of correct information.
The spreadsheet file can be saved to the computer under any title but the worksheet where the information is listed in the spreadsheet needs to be Sheet1. The worksheet titles are at the bottom of the page and they look like tabs. We recommend not importing more than 500 records at a time not only because of the time it takes but smaller imports allow for better control and verification of correct information.
How do I set up the Spreadsheet?
How do I set up the Import Requirements process?
Frequently Asked Questions
Back to the Top
There are several fields that can be used in this import as listed in the table below, but the first four fields (in red) must be included in each record (row) in the spreadsheet.
| Field Name |
Type |
What is it?/Where to find it? |
| Company Code |
Code |
Found in Admin > Codes > Companies - Code not Description |
|
Employee
Number
|
Open Text |
Student File > Contact Info Page > Job Details Tab |
| Course Code |
Code |
Admin > Curriculum > Course Catalog |
| Date Needed |
Date (MM/DD/YYYY) |
Enter the Date by when the Student must complete the course |
| Job Requirement |
Hard Coded (Y/N) |
Enter Y for Yes this is a Job Requirement or N for No. |
| Priority |
Code |
Found in Admin > Codes > Requirement Priorities - Code not Description |
| Note |
Memo |
Any note/explanation as needed for this Requirement |
Use the COLUMNS to hold the fields that should be included in the import and each ROW for the entire course taken record for each student requirement.
Below is an example of a requirements import spreadsheet.

IMPORTANT NOTES:
1. Before saving the spreadsheet for import, always remove the column headers, but make note of the fields included and order.
2. When modifying a spreadsheet, be sure to delete ROWS and COLUMNS that are not needed instead of Edit > Clear Contents; otherwise the import will recognize those blank ROWS and COLUMNS and generate an error or add blank records.
3. Make sure to save the spreadsheet as an Excel 1997-2003 file (i.e. an xls file) as the import cannot accept an xlsx file.
Back to the Top
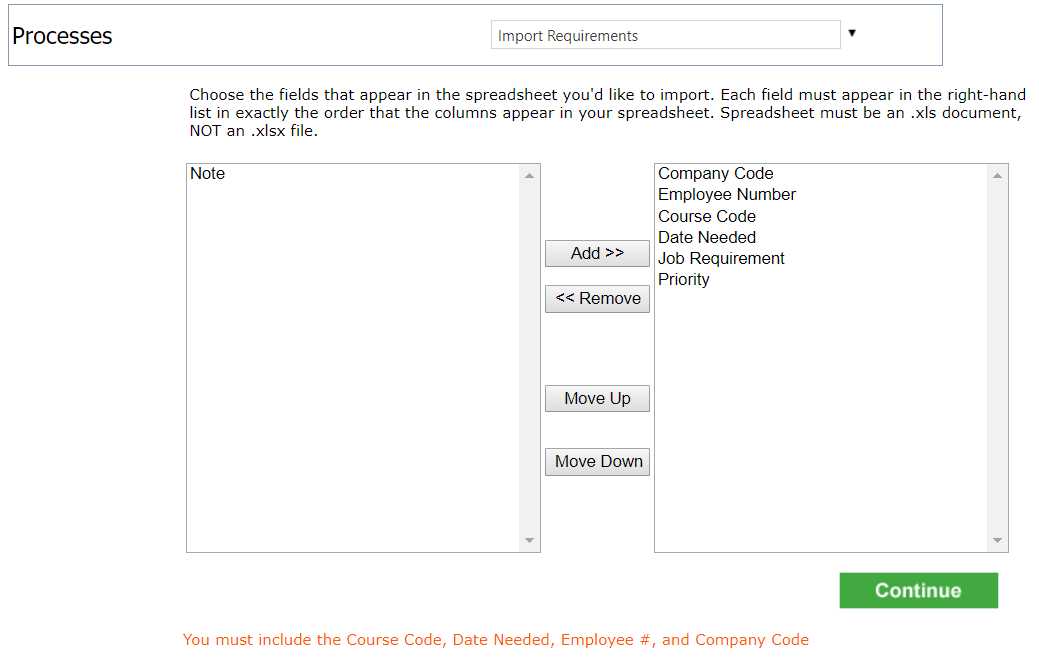
- Use the field lists on the left hand side to Add >> any additional fields to the right hand side that are in the spreadsheet.
- Be sure the fields listed on the right hand side are in the same order as the COLUMNS in the spreadsheet. Use the Move Up and Move Down buttons to rearrange the fields as necessary.
- If too many fields are listed on the right hand side use the << Remove button to take off the field.
- Once all the necessary fields are selected on the right hand side and they match the order of the fields on the spreadsheet click the >> Continue button.

On the next page select your spreadsheet and click import.

Back to the Top
Why am I getting an error when trying to import my spreadsheet?
Make sure that the worksheet has the same number of columns as fields selected in the setup. Note: if contents were cleared from a column instead of deleting the whole column, this could cause issues.
Make sure that the spreadsheet is saved as an xls file and not an xlsx file. Cyber Train can only import xls files.
Make sure that the name of the page in the worksheet is Sheet1, anything else will cause an error.
See also
|